Category Archives: Projects and Games

Tis the Season for Shoebox Packing!


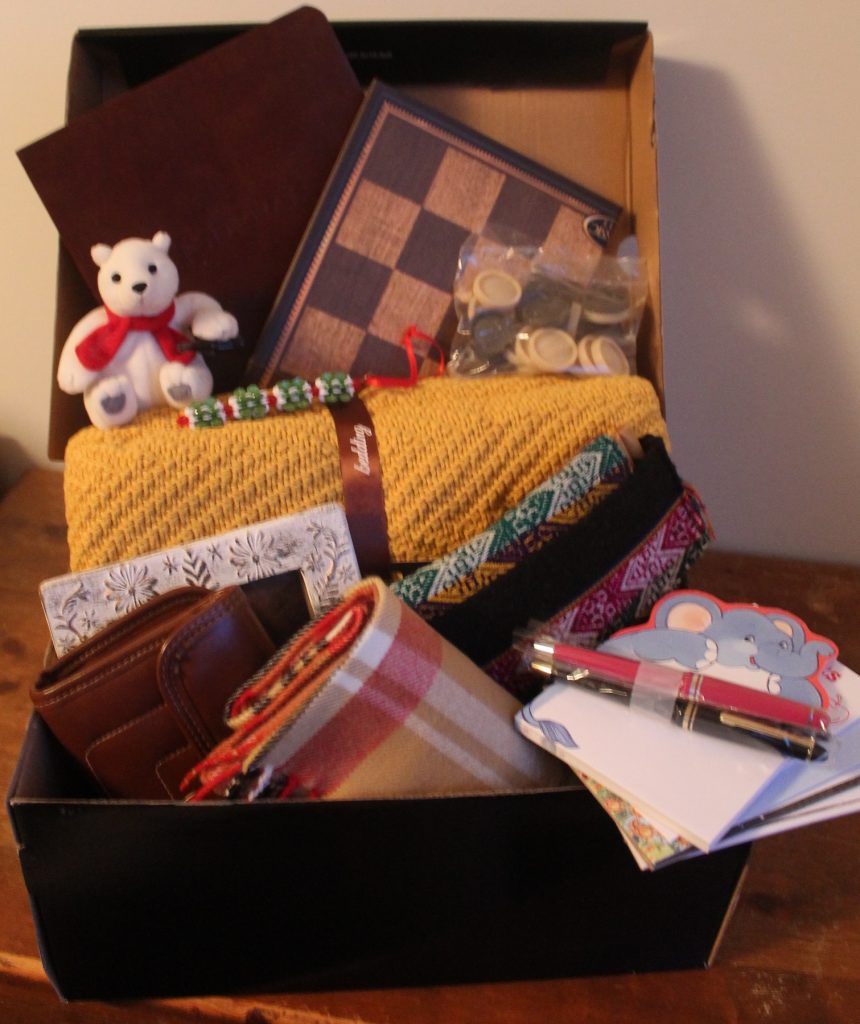
“God’s Box” Photo copyright (c) 2021 V.P.B.
An excellent hands-on outreach project that you can do with your children this time of year is packing a shoebox together for Operation Christmas Child.  Each shoebox you pack and drop off with OCC will be given out with the Gospel, impacting not only the child who receives it but also potentially reaching that child’s family and community with the good news of Jesus Christ as well.

If you’ve never packed a shoebox before, here’s a brief “how-to.” 

  1. Find a standard-size adult shoebox and wrap it if you like – cover must be wrapped separately from the box so items inside can be inspected.  (You can also use pre-printed boxes from Samaritan’s Purse or plastic shoeboxes from the store.) 
  2. Choose a “wow item” to go in the box – something a child would be excited to receive such as a doll for a little girl or a soccer ball and hand pump for a little boy or a stuffed animal for either. 
  3. Fill the rest of the box with smaller items – hygiene items like toothbrush, deodorant, soap and washcloth or school supplies like pencils and a sharpener, crayons, scissors, and a calculator.  You can also put in additional toys – maybe a jump rope, flashlight, little cars, games, etc.  If you enjoy handcrafting items, get creative and make something special!  Clothing items can be great to include, too, such as tee-shirts, socks, flip-flops, or underwear. 
  4. Remember not to put anything in the box that’s not allowed by OCC.  For example:  war items, liquids, toothpaste, medicines, or candy.  You can find a list of prohibited items on the OCC website along with examples of many, many more things that you are allowed to include.
  5. Write a personal letter to the child and consider enclosing a photo of your family.  Attach a label to the outside of the box, indicating the age and gender of the child to receive the gift.  You can print a label from this page.
  6. Take the shoebox along with a donation of $9.00 (covers shipping the box across the world) to a local church during collection week.  If you need help finding a church that’s collecting shoeboxes for OCC, check here.  Last but not least — don’t forget to pray for the child who will receive the box you and your family put together!

That’s it!  It’s very simple but incredibly rewarding, and I love that each box is a reflection of the child or family who packed it.  It’s an opportunity to reach across time and space and touch the life of a child you would likely never have met in person.  After collection week, your box will be delivered to a processing center here in the States to be checked over and then it’s on its way to one of over a hundred different countries in the world for distribution.  Shoeboxes are handed out by volunteers in local churches overseas, and in many countries, children receiving a shoebox also have the opportunity to enroll in The Greatest Journey, a twelve-week Christian discipleship course.

If you’re concerned about the amount it will cost to pack a box or multiple boxes all at once, try spreading the project out through the year.  Purchase a couple items each month rather than trying to buy them all at one time.  Look for sale items and be aware of “extras” that might come through your hands.  When we ordered socks recently for our daughters, we ended up with packages that were a substitution for our original choice, but the substituted packs included bonus pairs!  Things like that can go in a shoebox at no cost at all.   Also recently, a lady at our church put some items on a table at the back for anyone to take that could use them.  After I made sure others had had a chance to look over things, I picked out a brand-new, small piece of pretty wall art that was left behind.  It  will be the start to a shoebox for a teen girl next year!  And one of my girls found a child’s sweatshirt (also new) among the items, which she’ll use to start filling a shoebox of her own.    

Here’s a testimony that I recently submitted to Samaritan’s Purse when they reached out to local project leaders for feedback:

Because we do encourage others to pack shoeboxes, we wanted to make sure it was something someone could do even if they didn’t have much money.  So, we prayed at the beginning of the year* for God to pack a box for us to show us that it could be done for literally nothing.  We even prayed for the $9.00 to ship it.  Then we waited — God answered our prayer in the affirmative!  We now have a big shoebox entirely full of brand-new things that God sent in over the next few months, from little things like stationery and pens right up to and including a heavy, colorful blanket for a wow item! 

We had no idea how God would send us a wow item for free, but we knew that God can do anything!  Only a few weeks after our prayer, my husband received an offer at his workplace for us to pick a free Christmas present on a special website.  We both looked at one another and smiled —  we knew who the present was really for.  We had so much fun looking through the list of items and choosing that blanket for a child we will never meet this side of Heaven.  And when some unexpected dollars came in, we set it aside until we had the nine dollars we had prayed for. 

We call it “God’s box,” and we know that He has a special child in mind to receive it.  We have a small family business that does a newsletter each month, and we’re writing about “God’s box” this month to encourage those who think they can’t afford to pack a shoebox that if it’s in their heart to share the Gospel with a child, God can make a way.  It was also a faith booster for our own children to see how God put that box together.  We love the shoebox program precisely because it allows us to be the hands and feet of Christ in spreading the Gospel to other nations.  Thank you for allowing us to be involved.

If you’re reading this and you’ve never packed a shoebox before, consider packing one this year and blessing a child with the opportunity to learn about the “reason for the season” – JESUS.

Every good gift and every perfect gift is from above, and cometh down from the Father of lights . . .              James 1:17a

signature-2
Copyright © 2021

* Timeline note:  I should have been more clear here when I wrote this testimony – “the beginning of the year” was actually right after collection week happened last year, so this refers to the starting over of the “shoebox year,” not the calendar year – thus the reference only a short time later to Christmas.

Open-Faced Chicken Sandwiches

This is a recipe that I concocted recently and that we’ve been using frequently, especially since finding limits on meat and many other items at the grocery store.  It’s budget-friendly, very filling, and tastes like Thanksgiving.  😊  This is a great recipe for involving multiple family members when it’s time to get it on the table as a couple people can work on the chicken while another makes up the stuffing, another toasts the muffins, another tends the gravy, and so on.  Serves 12.

Ingredients:

  • 6 chicken leg quarters
  • 4 boxes of stuffing (6 oz. each), chicken or turkey flavored
  • 12 English muffins
  • 3-4 tablespoons of butter, melted, used for toasting the muffins
  • 1 envelope of chicken or turkey gravy mix (approx. 0.88 oz.)
  • a splash of Gravy Master (optional browning seasoning)
  • a few spoonfuls of flour
  • 7-8 cups of water
  • 3 cans of your favorite vegetable as a side
  1. Rinse the chicken leg quarters and place them in a 7-quart crockpot.  Pour 6 cups of water over them and cover.  Cook on high for several hours and then turn back to low for several more hours until the meat is cooked through and falls easily from the bones.  Once the meat is done, use a slotted spoon to remove the meat to a plate for “picking off.”  Using a couple of forks, pick through the chicken to separate the pieces of meat from the bones and skin, etc.  Set the meat aside in a bowl, discard the rest (but not the stock!).
  2. Prepare the stuffing according to package directions.  [Note: we drastically cut the amount of butter called for in the stuffing directions as the stuffing will be covered in gravy and have plenty of flavor anyway.]  Lightly butter and toast the English muffins.  Heat a vegetable of your choice.
  3. Pour the chicken stock (from the crockpot) through a strainer and into a roasting pan and put it on a large burner on the stovetop.  Sprinkle the gravy mix over the top and use a whisk to stir it in.  Bring to a boil.  While you are waiting for it to boil, fill a small (clean) pickle jar 2/3 full with cold water.  Spoon several large spoonfuls of flour into the water, cover, and shake vigorously.  Once the stock comes to a boil, stop shaking the flour/water mixture and pour it slowly into the stock, stirring continually.   If the gravy is not thick enough, repeat the water/flour mixture using less water and more flour and again waiting for the gravy to come to a boil before whisking it in.  If you wish to add a splash of Gravy Master, it does give the gravy a nice color and a little extra flavor. Once the gravy is done, stir in the chicken you had set aside.
  4. Place two halves of an English muffin on each plate and put a large spoonful of stuffing on each half.  Use a ladle to cover them generously with the chicken gravy.  Serve each with a scoop of your favorite vegetable and enjoy!

signature-2
Copyright © 2020

Mixed-Media Painting: Simple Beach Scene

About a year ago I was visiting a French market in New Brunswick, Canada, with a sweet friend and several of my (also sweet) daughters.  We came across a stand where a local artist had created paintings using acrylics and a variety of found objects from nature, such as shells, bits of driftwood, tiny pebbles, and so on.  As soon as I saw those paintings, I thought of the children in the homeschool group and tucked the idea away in the back of my mind, planning to simplify and adapt the idea for a group craft.  Strangely enough, we arrived home from vacation to find that my grandmother was displaying all the shells she’s collected over the years before getting rid of them.  I asked her if the homeschool group might have the little ones when she was ready to pass them along, and – voilà – we were halfway to having a craft night.  

The scene depicted above was not copied from the artist at the market.  It is a scene I created, keeping in mind that I wanted it to work with a wide variety of ages (so it needed to be simple enough for the younger children but interesting enough for the older ones) and somehow incorporate shells and other media.  The supply list and directions given below name certain colors of Apple Barrel brand acrylic craft paint—which were on a very good sale the night we picked up supplies (Thank you, Lord!)—but you could substitute other colors or another brand or even different mixed media and still complete the project successfully.  Be creative and have fun!

Click here for PDF document containing supply list and directions.

A few samples of finished paintings by children in the homeschool group:

signature-2
Copyright © 2019

It’s Never Too Late to Learn

My great-grandfather was a character.  He never owned a car, instead riding a bicycle everywhere he went – even into his eighties, and even with a roller full of clams hung from each handlebar.  By the time I came along, he was widowed, had outlived two of their children, and was living in a tiny one-room house decades before tiny houses became popular.  He did all sorts of hard physical labor through his life – grave digging, blasting, quarrying, running a lobster pound, and more – to the point that the first knuckle of every finger had been broken at one time or another and never properly set, so each fingertip leaned over at an angle.  He had survived multiple bouts of cancer on his lips; yet in all the times we visited him, I never heard him complain.  What we did hear were his stories – so many stories of the past – and sometimes for a special treat, we’d hear his music.  He played the fiddle, each one of those crooked fingers deftly holding the bow or pressing the strings.  And he played the harmonica beautifully in spite of the lasting damage from his cancer treatments.  He was a joy, and it came out as he played.

In contrast, I played clarinet in elementary school for two years, practicing little and wondering why I kept getting the third clarinet part.  I briefly tried to learn piano when we were first married, but it didn’t come easily and I didn’t stick with it.  After that whenever I was asked what I played, I jokingly shared of my expertise with the CD player’s “Play” button.

I never forgot Grampie Henry’s harmonica though.  It always had a soft spot in my heart.  And so this past summer, after having watched many members of the family branching out into numerous instruments over the years, I asked Lisa, “Do you think a harmonica would fit in?”  She said she thought it might if I wanted to try it.  So I took the plunge, buying an instructional book and DVD set plus a harmonica in the key of C major.* 

I worked through the first five or six lessons from the book and DVD, enough to get the basics, but then wanted to move from its folk music focus over to hymns and Gospel songs.  I’ve learned a lot and had a lot of fun with it over the past several months.  And it’s been good to be learning something new and way outside my comfort zone, giving the children one more example that learning lasts a lifetime.

What have I learned so far?  The harmonica is a great starter instrument.  I’ve learned to sight-read notes in the treble staff from the B below middle C to the A above the staff.  Since a standard harmonica is in the key of C major, I’ve learned to transpose songs to the key of C.  (And I’ve compiled what I’ve learned about transposing into a printable Transposer tool, available here as a free PDF file.  I use it myself whenever I want to learn a new song.)  I’ve gone through our hymnbook, jotting down the hymns in each key that I’d like to learn how to play, so I’ve been able to identify the most common keys for the music I like.  That’s important because the number of hymns in each key helps me decide what key of harmonica to buy next. 

And the nice thing is that any song you can learn to play on a C harmonica, you can play in any other major key simply by using a harmonica in that key.  For example, a couple of our daughters were working on “I’d Rather Have Jesus” on guitar and mandolin.  I found some sheet music, transposed it down to C, then asked what key they were playing in.  Since they were playing in G, I could join them (after considerable practice) using my G harmonica, reading the C sheet music and playing just as if I was using a C harmonica.  The reed patterns in the different harmonica keys are designed so the player just uses the same pattern of notes for music in C, and the instrument plays the right notes for the desired key.  More advanced players can use a single harmonica for multiple keys using a technique called “bending,” but I’m not there yet.  I’m just enjoying playing music.

It’s good to keep learning.  I often say that I’ve learned more of history and geography since we started homeschooling than I ever learned through my years of public school and university.  Since getting married, I’ve had to learn about simple home maintenance, desktop publishing, graphic design, a touch of woodworking, a bit of appliance repair, and a lot more.  And with the harmonica, I’ve been taking baby steps toward playing an instrument.  I’d encourage you to continue learning and thereby cultivate a love of learning in your children.  If you or your children have ever considered exploring music but haven’t acted on it, picking up a low-cost introductory harmonica kit – many come with a C major harmonica, book, and DVD – can be fairly inexpensive (under $20) and could be a lot more fun than you’d ever expected.**

Finally, just to whet your appetite a bit for how a harmonica – often thought of as a blues, folk, or jazz instrument – can fit into Gospel music, here’s Buddy Greene playing a soulful rendition of “He Leadeth Me.” (warning: This links to YouTube.) And just to show that it is possible to pick up an instrument in adulthood, here is an audio recording of me playing “Just As I Am”:

* Some prefer Hohner brand harmonicas, but after a fair amount of research, Lee Oskar looked like the best choice for me.  His harmonicas have easily replaceable parts and plastic combs (rather than wood), so swelling from moisture shouldn’t be an issue.  Plus, there are many keys available.

** My wife mentioned that another good, inexpensive introductory instrument is the recorder.  It also gets players reading the treble staff and is simple to pick up and start learning.  We have enjoyed using the Yamaha Soprano Recorder (key of C) and The New Nine-Note Recorder Method by Penny Gardner, which is easy for children to follow.

signature-1

Copyright © 2019